Showing posts with label #christmas. Show all posts

Crafters' Christmas List- Love, The Crafters' Advocate


Oliver The Elf

If you are reading this you might be a crafter or know one.  Somehow, you can relate.  I urge you to print/pin this and share it with your friends, family, and local craft store.

I love making cards, gifts, and baked goods for people.  It's time intensive and labor intensive.  Often times my fiancĂ© get's upset with me because I spend so much time on "just a card" that someone "won't appreciate".  The cards that I make for people (posts to come after the holiday season) take me over five hours each.  I tend to make all aspects of my cards because buying all of the supplies can be so costly.  It can actually be more expensive to hand make items if you are starting as a new crafter than it is to just go buy something which is why this year I'm trying a new angle,  SANTA!

Shop Amazon - Top Holiday Deals in Toys

If you pay close attention to everything I have made over the last 5 years for people you can see that they have the same paper patterns, colors, and accents just used differently.  This isn't because I want to.  It's because SUPPLIES ARE EXPENSIVE.  Individually items are cheap but they add up QUICKLY!  I usually buy items in sale sections off season and use everything sparingly.

I took it upon myself to write a letter to santa on behalf of all crafters.  Hopefully it helps us.  If you do not know what an item is on the list you can look it up in the amazon search in the side bar to the right and it will bring up a picture of it.   If you are buying these items I suggest you get them all at one place on one receipt.  I find AC MOORE has a great return Policy.  For big ticket items I buy everything on Amazon.  I am also a Prime member so I get free two day shipping (I found a holiday promotion for amazon and put the link below the list).  It's totally worth it.

Dear Santa,

This year I was really well behaved.  I made so many crafts that I could work full time in your work shop.  Are you hiring?  I've been trying my best to spread holiday cheer this year.  I even made my dog into an Elf ornament!  I am writing to you on behalf of year round crafters, bakers, cheer spreaders,  and smile givers.  We are running low on supplies and are afraid that this will lead the world into a downward spiral of doom and gloom.  A little glitter goes a long way.

This year I am leaving out an array of holiday treats for you, the reindeer, and the elves so please stop by.

Much Love From,

Kakie Murray
The Crafters' Advocate 


STOCKING STUFFERS
Glitter **
Rubber Stamps **
Washi Tape
Ink Pads- In Random Colors **
Ribbonn **
Glue Sticks **
Double Sided Tape **
Wall Paper Samples
Card Stock Scrap Pack
Hole Punchers **
Stickers**
Die Cuts **
Embellishments- Any season/ Occasion/Event
Fabric Samples
Glue Gun Sticks **
Small Glue Gun **
Stencils
Scissors **
Flat Back Crystals **
Exacto Knife **
Specialty Markers & Pens **
Modge Podge **
Arlene's Tacky Glue **
Sprinkles  **
Icing Tips  **
Pastry Bags **
Cookie Cutters **
Spatulas **

TREE
Cardstock **
Cadrstock Storage
Craft Organization
Storage Cubes
Work Table
Sewing Table
Sewing Machine
Sewing Organization
Thread Spools
Gift Card- To Fabric/Craft Store 
Non Stick Craft Mat **
Silpat **
Fabric
Scoring/Cutting Pad **
Kitchenaid Mixer **
Kitchenaid Mixer Accessories **
Paper Cutter **
Cricut **
Cricut Cartridges **
Cricut Accessories **
Silicone Pans **
Embosser **
Paper Cutter **
Macbook Pro **- To visit their favorite website kakiemurray.blogspot.com for ideas. 

Shop Amazon - FREE One-Day Shipping on Select Products

** Means I have it and use it all the time and highly suggest this product to any crafter baker.  This also means that I run out of these products.

The person you are buying for may only specialize in one craft.  Most of these items I use for many different types of crafts (card making, scrap booking, ornament making).  If you are buying common items like ink pads get colors they might not have like turquoise.  My craft supply is at the bare minimum at the moment and I have started with the primary colors.  If you are buying stamps get something that might interest them (I always love a great Boston Terrier stamp) that they can use on different projects.  Right now in the stores there are a lot of holiday oriented craft supplies.   Remember that we craft year round and love to give for all occasions so for me a great "Gone Fishin'" embellishment that I could use on a card for Uncle Jim Bob is just as awesome as that marked up Snowman you are considering buying.  Just keep that in mind.

Fellow Crafters-- What's on your list this year?  Leave a comment and I will add it!  What do you use all the time?  What's your MUST have item?  Pin it and drop a hint to your friends and family! ;)


BURLAP WREATH-Pinecone Wreath Makeover

Sometimes...I just can't help myself.  I was given a pinecone wreath as a gift and I thought it was really cute.  My original thought was that I would hang the pinecone wreath on my door with fresh greens behind it. Well, that didn't happen.  I love me my burlap.

You can do this technique with any wreath, really.  I like the way it looks so much that I might make a small one for inside my apartment.  This was so easy that you could do this with your children. 

How cute is this?

MATERIALS USED:

PINECONE WREATH 
BELLS
BURLAP SQUARES (with gold highlights on them)
RIBBON
HOT GLUE GUN

DIRECTIONS:

1. GLUE BELLS ON WITH HOT GLUE GUN.

2. GLUE BURLAP SQUARES ON.  Fold squares and glue into all the little nooks and crannies of the pinecones.  Glue the squares in different directions. CLICK HERE TO SEE HOW I MADE MY BURLAP & GOLD SQUARES

If you are doing this activity with children you can use a child friendly glue.  Just make sure it dries clear.

3.  ADD  TO YOUR EXISTING BOW.  I did this by making single loops and putting them behind the bow.

4. FLUFF YOUR BURLAP AND TAKE OFF ANY UNWANTED FRINGE.  I did leave some of the pinecones showing.  I actually didn't intend to put that much burlap on.  I got a little carried away.  

5. HANG AND ENJOY.


If you like the way this wreath looks you might want to check out how to make my Burlap Pom Pom Ornament:  BURLAP POM POM ORNAMENT  

ORIGINAL GIFTED WREATH 


WITH THE BELLS

FOLDED SQUARE.  GLUE GOES ON INSIDE CORNER.

RIBBON LOOP 


BURLAP Tree Skirt


This is Oliver.  He needs to be the center of attention.

  
This year I had the unique experience of discovering that my fiancĂ© left my tree skirt and angel tree topper in storage which is more than an hour drive away.   Well, I have this weird christmas purchasing habit.  I buy garland and never know what to do with it.  I just know I like it.  I have garland bells, garland beads, and even cheap dollar store gold garland. I have tried draping it but I live in an apartment.  I don't have banisters or archways.  I have modern manly looking Ikea furniture.  It never works so year to year I just put it back in the storage box (heart broken).


If you read my BURLAP POM POM ORNAMENT post you know that I had just under 3 yards of burlap just layin' around my apartment.  VOILA!  Problem solved.  My hoarding of garland was for nothing and now I  have almost used all of the burlap up now!  I think I have one or two more small projects that I can still make.  I paid $8 for 3 yards of this loosely woven burlap and I'm making so much out of it!  How happy am I?

SUPPLIES NEEDED:
BURLAP
BEADED WOODEN GARLAND
GOLD BEADED GARLAND
HOT GLUE GUN
NON STICK CRAFT MAT


DIRECTIONS:
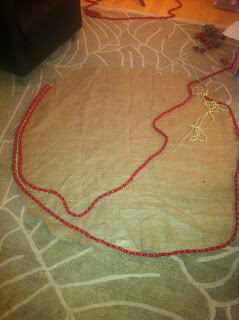
1. CUT YOUR BURLAP INTO DESIRED CIRCLE SIZE.   You can make this for any sized tree.  The outer edges of the circle should line up with the widest part of the tree.  (Reference my tree picture).

2.  CUT HOLE IN CENTER OF YOUR CIRCLE.  If you notice my circle isn't quite perfect.  It's not a big deal. Nobody's perfect.  Pick the side that you like the best for the front and then CUT A LINE STRAIGHT BACK FROM THE CENTER CIRCLE TO THE OUTSIDE.

3. PLAY AROUND WITH HOW YOUR GARLANDS WILL LOOK TOGETHER.  DECIDE ON YOUR PATTERN BEFORE YOU START.

3.  STARTING WITH THE BACK OF THE TREE SKIRT AND YOUR OUTSIDE GARLAND BEGIN TO GLUE ALONG THE EDGE.  GLUE 4-5 BEADS AT A TIME.  HOLD IN PLACE PRESSING FIRMLY UNTIL THEY ARE SET.  DO THIS ALL THE WAY AROUND THE SKIRT.

4. USING THE SAME TECHNIQUE YOU DID WITH THE OUTTER GARLAND GLUE THE GOLD GARLAND ALONG THE INSIDE.  THIS TIME YOU CAN USE A DOT OG HOT GLUE EVERY SO OFTEN.  YOU DO NOT NEED A LOT OF GLUE FOR THIS GARLAND AS IT IS BETWEEN THE TWO GARLANDS.  MAKE SURE THAT IT IS PRESSED UP RIGHT NEXT TO YOUR FIRST ROW.
5. REPEAT WITH YOUR LAST ROW OF GARLAND.  PUTTING THE GLUE ON THE INSIDE OF THE GARLAND SANDWICH.  BE SURE NOT TO USE TOO GLUE AND MAKE SURE THAT YOU ARE STILL FIRMLY HOLDING EACH SECTION IN PLACE UNTIL IT IS SECURE.
6. ONCE YOU HAVE FINISHED  DECORATING THE OUTER EDGES OF THE TREE SKIRT DECORATE THE INNER CIRCLE AND THE CUT OUT TO THE EDGES.  The only reason that   I did not continue the red and gold on the back is because I ran out of the red garland.  
As you can see below I toyed with the idea of bells along the back.  I was going to use them and twine loops as a closure.  I decided to keep my tree skirt more simple as my tree itself has so much decoration.      There are many different possibilities that you can do with this.  If you feel the need to you can put a clasp on the back of the skirt but I find that the weight from the beads and glue keeps it in its place fine.
I am a firm believer all inclusive activities.  If you see something on my blog that you would like to do with someone that has a disability of any kind please send me a message and I will try my best to adapt my post!  I have 15 years of experience working and loving with people with disabilities so it I would be honored to know that my crafts are being shared in the community.  

Burlap & Gold Pom Pom Ornament


Big fan of burlap over here!  I bought some so I could get a handle of what I will need to buy for my wedding (Stay tuned for my WEDDING DIY BLOG).  I really couldn't get an idea of how much I really needed to cover a silly table.  I bought 3 yards of the cheaper more "rustic" burlap and decided that there is no way I could use this for my wedding.  

I love how burlap and gold look together.  I really love subtle gold highlights on anything so I decided to make a "pom pom" with gold high lights.  I have a couple of different colored metallic paints so I am going to make a few pom poms and hang them.  You could really display them in a manner if different ways (wreaths, on stairway bannisters, from garland, in your windows, clustered in a decorative bowl,  or just on your tree).


Once I have have made all of them I will take a better picture for you!

MATERIALS NEEDED:
BURLAP
ROUND FOAM PAINT BRUSH
FABRIC SCISSORS
HOT GLUE GUN
CHRISTMAS ORNAMANET (OLD OR NEW)
GLOVES 


DIRECTIONS:
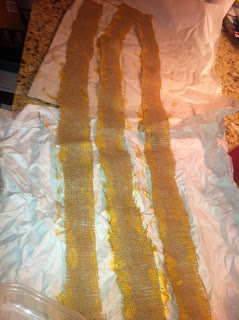
1. CUT BURLAP INTO LONG 1 INCH WIDE STRIPS. (My burlap is 60 inches wide and I cut 6 strips) 

2. PAINT DOWN THE EDGES OF THE STRIPS.  I did this by overlapping my burlap edges painting two edges at the same time to save time.  Do not worry if it looks sloppy.  You want it to be gloppy.  Look how bad mine is!  I had to blot mine on because I used the rustic burlap I had to be careful of the edges fraying.  

3.  ALLOW TO PAINT TO DRY.

4. CUT THE STRIPS INTO 1-1.5 INCH SQUARES.  I didn't aim for perfection.  I think mine ended up being all different.  

5.  GET COMFORTABLE.  Set up all of your squares, glue gun, and ornament.  I suggested that you use the craft mat because I get hot glue everywhere.  You also do not need to wear gloves.  I burned my thumb pretty bad with hot glue when I took off the rubber gloves. 

6. STARTING AT THE TOP OF THE ORNAMENT FOLD THE SQUARES SO THE GOLD ACCENTS ARE ON THE OUTSIDE.    YOU ARE PRETTY MUCH FOLDING A TRIANGLE SO THAT THE MIDDLE IS THE INSIDE OF YOUR SQUARE.  PUT A DOT A GLUE ON THE TIP AND STICK TO ORNAMENT.  HOLD IN PLACE UNTIL IT STAYS.  REPEAT UNTIL THE WHOLE THING IS COVERED.

7.  CLIP OFF ANY UNWANTED FRINGE.  TAKE OFF ANY GLUE STRANDS THAT MAY BE HANGING AROUND.  I HAD A TON OF THEM.  FLUFF.  If you want to put a big ribbon like I did than I suggest that you carefully pop out the little wire in the ornament and then place the ribbon down and put the wire down back on it.  Do not try to thread the big ribbon through.  You could break your ornament!  

I HOPE YOU ENJOY THEM AS MUCH AS I DO!!!  HAPPY HOLIDAYS!


I am a firm believer all inclusive activities.  If you see something on my blog that you would like to do with someone that has a disability of any kind please send me a message and I will try my best to adapt my post!  I have 15 years of experience working and loving with people with disabilities so it I would be honored to know that my crafts are being shared in the community.