This is Oliver. He needs to be the center of attention.
This year I had the unique experience of discovering that my fiancé left my tree skirt and angel tree topper in storage which is more than an hour drive away. Well, I have this weird christmas purchasing habit. I buy garland and never know what to do with it. I just know I like it. I have garland bells, garland beads, and even cheap dollar store gold garland. I have tried draping it but I live in an apartment. I don't have banisters or archways. I have modern manly looking Ikea furniture. It never works so year to year I just put it back in the storage box (heart broken).
If you read my BURLAP POM POM ORNAMENT post you know that I had just under 3 yards of burlap just layin' around my apartment. VOILA! Problem solved. My hoarding of garland was for nothing and now I have almost used all of the burlap up now! I think I have one or two more small projects that I can still make. I paid $8 for 3 yards of this loosely woven burlap and I'm making so much out of it! How happy am I?
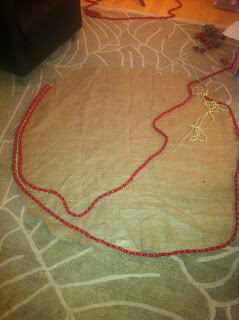
SUPPLIES NEEDED:
BURLAP
BEADED WOODEN GARLAND
GOLD BEADED GARLAND
HOT GLUE GUN
NON STICK CRAFT MAT
1. CUT YOUR BURLAP INTO DESIRED CIRCLE SIZE. You can make this for any sized tree. The outer edges of the circle should line up with the widest part of the tree. (Reference my tree picture).
2. CUT HOLE IN CENTER OF YOUR CIRCLE. If you notice my circle isn't quite perfect. It's not a big deal. Nobody's perfect. Pick the side that you like the best for the front and then CUT A LINE STRAIGHT BACK FROM THE CENTER CIRCLE TO THE OUTSIDE.
3. PLAY AROUND WITH HOW YOUR GARLANDS WILL LOOK TOGETHER. DECIDE ON YOUR PATTERN BEFORE YOU START.
3. STARTING WITH THE BACK OF THE TREE SKIRT AND YOUR OUTSIDE GARLAND BEGIN TO GLUE ALONG THE EDGE. GLUE 4-5 BEADS AT A TIME. HOLD IN PLACE PRESSING FIRMLY UNTIL THEY ARE SET. DO THIS ALL THE WAY AROUND THE SKIRT.
4. USING THE SAME TECHNIQUE YOU DID WITH THE OUTTER GARLAND GLUE THE GOLD GARLAND ALONG THE INSIDE. THIS TIME YOU CAN USE A DOT OG HOT GLUE EVERY SO OFTEN. YOU DO NOT NEED A LOT OF GLUE FOR THIS GARLAND AS IT IS BETWEEN THE TWO GARLANDS. MAKE SURE THAT IT IS PRESSED UP RIGHT NEXT TO YOUR FIRST ROW.
5. REPEAT WITH YOUR LAST ROW OF GARLAND. PUTTING THE GLUE ON THE INSIDE OF THE GARLAND SANDWICH. BE SURE NOT TO USE TOO GLUE AND MAKE SURE THAT YOU ARE STILL FIRMLY HOLDING EACH SECTION IN PLACE UNTIL IT IS SECURE.
6. ONCE YOU HAVE FINISHED DECORATING THE OUTER EDGES OF THE TREE SKIRT DECORATE THE INNER CIRCLE AND THE CUT OUT TO THE EDGES. The only reason that I did not continue the red and gold on the back is because I ran out of the red garland.
As you can see below I toyed with the idea of bells along the back. I was going to use them and twine loops as a closure. I decided to keep my tree skirt more simple as my tree itself has so much decoration. There are many different possibilities that you can do with this. If you feel the need to you can put a clasp on the back of the skirt but I find that the weight from the beads and glue keeps it in its place fine.
I am a firm believer all inclusive activities. If you see something on my blog that you would like to do with someone that has a disability of any kind please send me a message and I will try my best to adapt my post! I have 15 years of experience working and loving with people with disabilities so it I would be honored to know that my crafts are being shared in the community.


No comments:
Post a Comment